

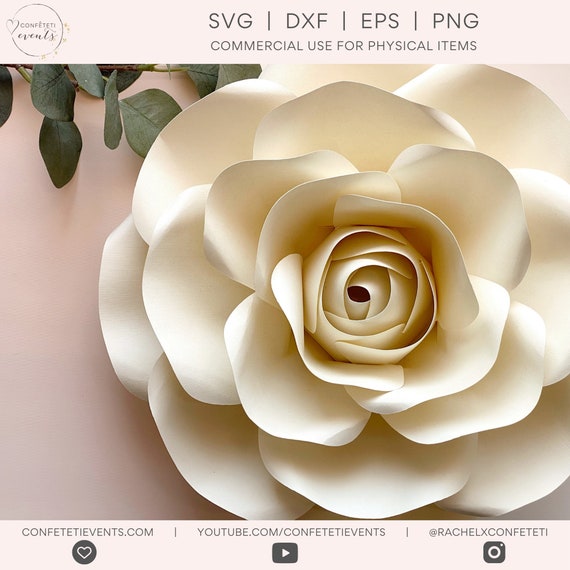
To assemble a vintage wedding rose Cricut, download the design and follow the step-by-step cutting instructions. Use adhesive to secure the pieces.
Vintage wedding rose Cricut projects add a timeless elegance to wedding decor. These projects are perfect for creating stunning invitations, centerpieces, and more. Start by downloading a vintage rose design from Cricut Design Space. Follow the cutting instructions provided by the software.
Use high-quality cardstock for a polished look. Once cut, carefully assemble the pieces using adhesive. The finished product will enhance any wedding setting with its classic charm. This DIY project is not only cost-effective but also adds a personal touch to your special day. Enjoy the process and create beautiful memories with your vintage wedding rose Cricut.

Credit: www.etsy.com
Introduction To Vintage Wedding Rose Cricut
Vintage-themed weddings are gaining popularity for their timeless charm. One way to achieve this look is through Cricut projects. The Cricut machine is a versatile tool that can create intricate designs. This guide will help you assemble a Vintage Wedding Rose Cricut project.
Overview Of Cricut Projects
Cricut machines are great for various crafting projects. They can cut, write, and score different materials. Popular materials include paper, vinyl, and fabric. The machine’s precision allows for detailed designs.
For a vintage wedding, Cricut can create elegant decorations. Think of invitations, table settings, and even party favors. The possibilities are endless with a Cricut machine.
Importance Of Vintage Themes
Vintage themes add a touch of elegance to weddings. They evoke a sense of nostalgia and romance. Using vintage elements like lace, roses, and muted colors can transform any venue.
The Vintage Wedding Rose Cricut project captures this essence perfectly. It combines delicate rose designs with a vintage flair. This makes your wedding day unique and memorable.
Here’s a quick overview of why vintage themes are so special:
| Element | Description |
|---|---|
| Lace | Delicate and timeless fabric |
| Roses | Symbol of love and romance |
| Muted Colors | Sophisticated and classic palette |
Vintage themes create a romantic and elegant atmosphere. They are perfect for making your wedding unforgettable.
Materials Needed
Creating a vintage wedding rose using a Cricut machine can be both fun and rewarding. To get started on this beautiful project, you’ll need a variety of materials. Below, you’ll find a comprehensive list of essential supplies and optional add-ons to enhance your creation.
Essential Supplies
Begin with gathering all the essential supplies for your vintage wedding rose project. Each item on this list is crucial for the process:
- Cricut machine: Essential for cutting intricate designs.
- Cardstock paper: Choose high-quality paper for durability.
- Cutting mat: Protects your work surface and ensures precise cuts.
- Design software: Use Cricut Design Space for creating templates.
- Glue gun: Secures petals and other elements firmly.
- Scissors: Handy for trimming and fine adjustments.
- Bone folder: Helps in creasing and shaping petals.
Optional Add-ons
These add-ons can give your vintage wedding rose an extra touch of elegance:
- Glitter: Adds sparkle to your rose petals.
- Ribbons: Use for wrapping stems or adding bows.
- Ink pads: For adding color and depth to petals.
- Embossing tools: Create texture and intricate designs.
- Floral wire: Provides stability and flexibility to stems.
- Paint brushes: Useful for applying glue and paint.
- Decorative pearls: Adds a vintage touch to the flower.
With these materials, you’re well on your way to creating a stunning vintage wedding rose. Enjoy the process and make it uniquely yours!
Designing Your Rose
Creating a vintage wedding rose with a Cricut is a delightful process. The design phase is crucial as it sets the foundation for your final piece. Let’s dive into the steps for designing your perfect rose.
Choosing A Template
Selecting the right template is the first step. Cricut Design Space offers a variety of rose templates. Look for templates tagged as “vintage” or “classic”. These templates often have intricate details that suit a vintage theme.
| Template Name | Style |
|---|---|
| Vintage Rose 1 | Classic |
| Antique Bloom | Elegant |
| Old World Charm | Ornate |
Customizing Colors And Sizes
Once you have your template, customize the colors. Vintage roses often feature muted, pastel shades. Consider colors like dusty pink, cream, or soft lavender.
- Dusty Pink: Symbolizes romance and charm.
- Cream: Represents elegance and purity.
- Soft Lavender: Conveys grace and sophistication.
Next, adjust the size of your rose. Decide where you’ll use the rose. Will it be part of a centerpiece or a smaller accent? Use the Cricut Design Space to resize your template accordingly.
- Open the Cricut Design Space.
- Select your rose template.
- Use the resize tool to adjust dimensions.
By choosing the right template and customizing colors and sizes, your vintage wedding rose will be perfect. These details ensure your design matches your wedding theme.

Credit: www.youtube.com
Preparing The Cricut Machine
Assembling a vintage wedding rose using a Cricut machine can be fun. The first step is preparing the Cricut machine. This step ensures smooth crafting and perfect cuts. Let’s dive into setting up the machine and choosing the right blade.
Setting Up Your Machine
Start by placing your Cricut machine on a flat surface. Ensure it is stable and not wobbly. Connect the machine to a power source. Turn it on by pressing the power button. Wait for it to light up.
Now, connect your Cricut machine to your computer. Use the provided USB cable. Alternatively, connect via Bluetooth for a wireless setup. Download the Cricut Design Space software from the Cricut website.
Install the software and follow on-screen instructions. This software helps in designing and cutting. Sign in or create a new account. This will sync your machine and designs.
Choosing The Right Blade
The right blade is crucial for clean cuts. Cricut offers various blades. For vintage wedding roses, use the fine-point blade. This blade is ideal for intricate cuts.
Ensure your blade is sharp. A dull blade can ruin your design. You can check the blade by cutting a small piece of paper. If the cut is clean, your blade is good to go.
Insert the blade into the blade holder. Secure it tightly. Check the blade depth settings. For cardstock, set it to medium depth. Adjust settings based on the material you use.
| Blade Type | Material | Depth Setting |
|---|---|---|
| Fine-Point Blade | Cardstock | Medium |
| Deep-Point Blade | Thicker Materials | High |
| Rotary Blade | Fabric | Variable |
Cutting The Rose Pieces
Cutting the rose pieces is an essential step. Follow these steps to ensure precision and perfection in your vintage wedding rose Cricut project.
Loading The Mat
First, gather your materials. You will need:
- Cricut machine
- StandardGrip mat
- Cardstock paper
Place the cardstock on the mat. Align it carefully to the grid lines. Smooth out any bubbles or wrinkles.
Next, load the mat into the Cricut machine. Ensure the mat is aligned with the machine’s guides. Press the load button to secure the mat.
Executing The Cut
Open the Cricut Design Space on your computer. Select the vintage wedding rose design.
Adjust the settings according to the material type. Use the following settings:
| Material | Blade Type | Pressure |
|---|---|---|
| Cardstock | Fine Point Blade | Default |
Click on the “Make It” button. Preview the design layout on the mat. Confirm everything looks correct.
Press the “Go” button on the Cricut machine. The machine will start cutting the rose pieces. Wait until the cut is complete.
Unload the mat from the Cricut machine. Carefully peel off the cut pieces from the mat. Use a spatula tool if needed to avoid tearing the paper.
Now, your rose pieces are ready for assembly. Enjoy creating your vintage wedding rose!
Assembling The Rose
Creating a vintage wedding rose using Cricut is a fun project. Follow these steps to assemble the rose perfectly. This guide will help you make a beautiful rose for any occasion.
Gluing The Petals
Start with the smallest petals. Apply a small dot of glue at the base. Press the petal onto the stem. Hold for a few seconds until the glue sets. Repeat this process with each petal size. Use more glue if needed. Make sure the petals overlap slightly. This gives a natural look to the rose.
Here’s a quick guide:
- Smallest petals first
- Apply glue at the base
- Press onto the stem
- Hold for a few seconds
- Overlap the petals
Creating The Stem
Use floral wire to make the stem. Wrap green floral tape around the wire. Start at the top and work down. Make sure the tape is tight. This will give a smooth finish. Attach the petals to the top of the stem. Use glue to secure them in place. Finally, add some leaves for a realistic touch.
Steps to create the stem:
- Get floral wire
- Wrap with green floral tape
- Start at the top and work down
- Ensure the tape is tight
- Attach petals at the top
- Secure with glue
- Add leaves for realism
Remember, patience is key. Each step builds on the last to create a beautiful rose.
Adding Finishing Touches
Once you’ve assembled your Vintage Wedding Rose Cricut, it’s time to add the finishing touches. These details make your project stand out. Let’s explore some ways to enhance your creation.
Applying Glitter Or Paint
Adding glitter or paint can give your rose a magical touch. Choose colors that match your wedding theme. Use a fine brush to apply paint to the petals’ edges. This gives a more realistic look.
- Choose fine glitter for a subtle sparkle.
- Apply glue to the petal tips before adding glitter.
- Use metallic paint for a shiny effect.
Let the glitter and paint dry completely. This prevents smudging and ensures a neat finish.
Incorporating Decorative Elements
Adding decorative elements enhances the beauty of your vintage rose. You can use pearls, ribbons, or tiny beads.
| Element | Use |
|---|---|
| Pearls | Glue them to the center of the rose. |
| Ribbons | Tie them around the base of the flower. |
| Beads | Scatter them on the petals. |
These small details add elegance and charm to your project. Your vintage wedding rose will look stunning and unique.
Incorporating Roses Into Wedding Decor
Incorporating roses into wedding decor can create a timeless and elegant atmosphere. Using a Cricut to craft vintage wedding rose designs brings a unique touch to your special day. Whether for centerpieces, bouquets, or boutonnieres, roses always add charm.
Table Centerpieces
Table centerpieces are crucial for a wedding reception. Crafting vintage rose centerpieces with a Cricut can be a delightful task. Here’s how to do it:
- Choose rose templates on your Cricut.
- Cut out roses using quality cardstock.
- Assemble the roses by layering petals.
- Arrange these roses in elegant vases or jars.
You can also add some greenery or baby’s breath. This will enhance the beauty of your centerpiece. Use different shades of roses for a vibrant look. Combine these with candles for a romantic touch. Your guests will surely admire your creativity.
Bouquets And Boutonnieres
Bouquets and boutonnieres are essential for the wedding party. Creating them with Cricut roses is both fun and stylish. Follow these steps:
- Download rose patterns from the Cricut library.
- Cut the rose shapes from your chosen material.
- Use floral wire to assemble the roses.
- Add real or artificial leaves for a natural look.
For bouquets, you can mix Cricut roses with fresh flowers. This blend creates a unique and beautiful arrangement. For boutonnieres, keep it simple yet elegant. A single rose with a sprig of greenery looks classy. Tie it with a ribbon that matches the wedding theme.
These handmade touches will make your wedding day unforgettable. The effort you put into these details will surely impress your guests.
Troubleshooting Common Issues
Assembling a Vintage Wedding Rose Cricut can be a delightful task. But, common issues may arise, causing frustration. Here, we address troubleshooting common issues to ensure a smooth experience.
Fixing Uneven Cuts
Uneven cuts can ruin the design. Follow these steps to fix it:
- Check the Blade: Ensure the blade is sharp and clean.
- Adjust the Settings: Use the correct settings for your material.
- Secure the Mat: Make sure the mat is firmly in place.
If the cuts remain uneven, consider replacing the blade. A dull blade can cause uneven cuts.
Dealing With Paper Jams
Paper jams are common but easy to fix. Here’s how:
- Turn Off the Machine: Always turn off the Cricut before removing jams.
- Gently Pull: Carefully pull out the jammed paper.
- Inspect the Rollers: Check the rollers for any stuck pieces.
After clearing the jam, test the machine with a small piece of paper. This ensures everything is functioning correctly.
By addressing these common issues, you can create beautiful vintage wedding rose designs smoothly.
Credit: www.etsy.com
Final Thoughts
Assembling your vintage wedding rose Cricut is an exciting journey. These steps ensure your roses look stunning and last long. Here’s some advice to help you.
Preserving Your Roses
To keep your vintage wedding rose Cricut fresh, follow these tips:
- Store roses in a cool, dry place.
- Avoid direct sunlight to prevent fading.
- Use a light spray of water to keep them fresh.
- Handle the roses gently to avoid damage.
Proper care will make your roses last longer. This is important for preserving memories.
Personalizing For Different Themes
Personalizing your vintage wedding rose Cricut can be fun. Here are some ideas:
| Theme | Personalization Tips |
|---|---|
| Rustic | Use burlap and lace for a charming look. |
| Classic | Incorporate pearls and gold accents for elegance. |
| Modern | Choose metallic colors and geometric shapes. |
Each theme allows for unique creativity. Match your wedding style perfectly.
With these tips, your vintage wedding rose Cricut will shine. Enjoy creating beautiful decorations for your special day.
Conclusion
Crafting your Vintage Wedding Rose Cricut project can be both fun and rewarding. Follow these steps for a beautiful outcome. Enjoy the process and the stunning results. Your wedding decor will surely impress. Happy crafting and congratulations on your special day!


Leave a Reply